Wednesday, 13 March 2013

Super healthy homemade smoothie

I have recently been drinking a lot of homemade smoothies and am astounded about how quick and easy they are! I reckon this recipe takes me about 4 minutes in total...This version is also very cheap and doesn't rely on lots of fresh fruit so you can whizz one up at any time...


Ingredients and equipment

1 banana
A handful (80g) frozen mixed berries
A tablespoon of natural yogurt
100ml warm water
Food processor


Recipe

Put all the ingredients into the food process and whizz until smooth!


Notes

The frozen berries are great in this recipe as they make the smoothie cold without having to fuss around with ice. They are also much cheaper than buying fresh fruit (usually about £2 for 500g). Having said that, if you have any fresh fruit hanging around of course use it!
I have used warm water in this recipe as otherwise the frozen berries can make it too cold. If you prefer an ice cold smoothie however, use cold water. 

Nutrition

The berries in this smoothie provide one of your five a day and a good variety of vitamins and minerals. I use summer fruits which provides all the goodness of strawberries, blueberries, raspberries and redcurrants. Bananas are higher in carbohydrate content but contain high levels of potassium and vitamin B6 so shouldn't be avoided even by the waistline watchers!
Natural yogurt contains stomach friendly bacteria and low fat options can be used if you want to reduce calories. 
The original recipe contains about 150kcals. 

Variations

I sometimes add a handful of oats (and a bit more water) to this recipe in the morning to make a super healthy energy boosting breakfast! This ups the calories a bit but gives you a good portion of fibre and the heart-healthy benefits of oats without the effort of making porridge.

My housemate likes to make this smoothie with just banana and milk instead of water to make it more creamy. She adds honey and cinnamon to give it  satisfying sweetness.

There are many other possible smoothie variations. For the mega calorie phobic readers, forget the banana and add fat free yogurt and some fruit juice to the berries, gym bunnies can add protein powder for a post-gym recovery drink and readers suffering from flu can add orange juice for an extra vitamin C boost...


Sunday, 24 February 2013

Knitted cushion

With the sudden encore of frosty winter weather I have been unable to break my January knitting habit and therefore tried to direct my efforts to a useful project. I have seen a few patterns for cushion covers so thought I'd adapt one to make a quick and easy addition to my sofa....

The back of the finished cushion

The front of the finished cushion

This pattern can be adjusted to pretty much any kind of wool so I will avoid being too prescriptive here. The only thing is that you need to make sure you have enough wool to finish the project before you start.


Materials


Yarn and needles - I used just over one 100g skein of chunky double knit 'claret' coloured wool and 6.5mm needles. This made a 12 inch by 15 inch cushion. I think this project would work well with a finer yarn but will take a bit more time, you could also make a larger or smaller version.
Two skeins of 100g chunky claret wool
Cushion pad - You will need a cushion pad or stuffing to fill the cushion. A pad will make it easier to remove the cover if it needs washing.
Buttons - You will need four large buttons to fasten your cushion cover.
Tapestry needle and extra yarn - this is to finish the cushion as it is knitted in three parts.


Knitting Pattern


As I said, this is not really a traditional knitting pattern as it depends what size cushion you want to make. I will give you the pattern for my cushion however but you can adjust it accordingly. See my previous knitting post for more instructions on how to cast on etc.

For the front

  • Cast on 40 stitches
  • Knit in stockinette stitch (alternate rows knit and purl) until the work measures 2 inches
  • Knit in garter stitch (basic knit stitch every row) for a further two inches
  • Switch back to stockinette stitch for three inches
  • Garter for two inches
  • Stockinette for thee inches
  • Garter for two inches
  • Stockinette for two inches
  • Cast off
For the back

  • Cast on 40 stitches
  • Knit in stockinette stitch for 7 inches
  • Knit in garter stitch for 3 rows then knit an eyelet row:
  1.  Knit 7 stitches then bring the wool forward to it comes out of the work towards you instead of out though the back if the work. 
  2. Then knit 2 stitches together. 
  3. Knit 7 stitches then bring wool forward again (step 1) and knit 2 together (step 2)
  4. Repeat steps 1 and 2 twice more then knit to the end of the row 


  • Knit in garter stitch for another 3 rows 
  • Cast off
  • Cast on 40 stitches again and knit in stockinette stitch for 8 inches
  • Cast off
Finishing
Using tapestry needle two sew panels together
  • Arrange the three panels so that the neat sides are facing inwards and the two back panels are overlapping
  • Sew the three panels together so that they fit together like a cushion cover i.e. sew around the whole of the front panel binding it to the two back panels but do not sew the back panels together. There will be a small overlap of the back panels where you need to sew all three together

  • Once the cushion is assembled sew on bright coloured buttons at the appropriate place on the 2nd back panel so that they can be used to fasten the cushion through the holes created by the eyelet row
  • Stuff the cushion


Given that this project went well I'm going to give a cushion another go, perhaps using different colours. I'll let you know how it goes!


Thursday, 14 February 2013

Homemade cake stand (with homemade cakes!)

Introduction

I saw this idea for a homemade in a 'Vintage Gifts' book and decided to try it as I have always wanted one. In this project you can choose your own plates and glasses to made a totally unique cake stand that you can use at tea parties to display (preferably homemade!) biscuits and cakes. I've included a very reliable cupcake recipe at the end which has been my favorite recently as you can whip it up in no time with minimal ingredients and fuss. I'm no star baker but these work every time!

Vintage cake stand

Sourcing your materials

Three pretty plates
Two glasses
Glue suitable for sticking glass and ceramic together


All the materials required for cake stand


The first place to look for materials for this project is in your own cupboards. Any mismatched or slightly chipped but pretty crockery that you no longer use can be used to make a new piece of homeware.

You will need three places for a thee tiered stand and two sherry or shot glasses. You can arrange the items together as you would when they are stuck together to see how they look together. I would suggest that a large plate, a side plate and a saucer sized plate.You also need to make sure that the glass is the right size and shape so that the whole rim is in contact with the plate.

If you don't have anything suitable at home, check out any local vintage fairs, markets or charity shops for unusual and good value pieces. I found sherry glasses in almost every charity shop I looked in! Ebay is also a great source as there are plenty of lovely bits for one or two pounds. I would not necessarily purchasing online however as you will not get to try out how the pieces look together and postage can be expensive.
Find a suitable glue at a hardware shop or online.

Cost

All in all, this project could cost a few pounds depending on how expensive the crockery you use is. This project cost me £3.50 all together!

Making the stand

1. Make sure all your materials are clean and dry or the glue will not stick well.
2. Cover your work area with newspaper
3. Spread glue sparingly on the base of the shot/sherry glass and place it in the center of the largest plate. The glue I used set quickly so be sure to read the instructions before you start.

4. Spread glue on the rim of the glass and place the center of the next largest plate onto it.


5. Repeat with the next level of the stand.


And your stand is now finished! Resist fiddling with it until the glue is completely set, then you are ready to load it up with cakes and boil the kettle for some tea!


Orange and poppy seed cupcakes

Ingredients

2 tbsp poppy seeds
2 tbsp hot milk
85g softened butter
85g granulated or caster sugar
Rind of half an orange
1 large egg
100g self raising flour

1. Preheat the oven to 180 degrees centigrade

2. Heat the milk on the hob or microwave and add the poppy seeds

3. Work the butter and sugar together until uniform and smooth

4. Beat in the milk, seeds and egg then add the orange rind

5. Sift in the flour using a sieve

6. Mix gently using a metal spoon retaining as much air in the mixture as possible

7. Spoon the mixture uniformly into cake cases

8. Bake for 20 minutes or until tops are golden and springy

Makes 12 small cupcakes.

Double the recipe to make 12 muffin sized cakes.


How cakes should look fresh out of the oven


The finished cakes and stand


Wednesday, 9 January 2013

Knitting for beginners

Introduction

I know that knitting has always had somewhat 'grannyish' connotations but I think there are many reasons to get into it. Firstly, it is a great way to relax after a stressful day as it is creative but requires very little concentration. This means that you can do it in front of the TV or while chatting!You can also start and stop a knitting project at leisure as it requires no drying time, cooking time etc making it a good way to fill 10 minutes while you are waiting for the supper to cook for example! My friend Izzy and I used to spend many a companionable evening with our knitting and tea last winter, and somehow doing something at the same time made it seem productive too.
Secondly, you can make really personal, beautiful things. For example wearing a home-knitted scarf in a lovely wool or giving this to a friend feels very special! You can choose the exact type and colour of wool to suit the project too.
Thirdly, given the economic climate and cold weather I think that knitting is actually somewhat in fashion and that this alternative, cheap, productive and therapeutic hobby is back to stay.

I have done a bit of knitting on and of for a few years but have mainly stuck to scarves and snoods (circular scarves) with the odd branch out into fingerless mittens, mini stockings (at christmas) and, most recently, a hot water bottle cover.

I'm going to describe how to knit a snood and hot water bottle cover as I think these are the best things to start with and will be very welcome in January.

A simple snood

Burgundy Snood
This is the best project to do if you want to make something quite quickly and don't want to spend lots on wool or buy lots of different needles. Some people would do this on circular needles but this works fine and is a good way to practice your knitting without worrying about buying extra needles.

Materials

To make one like this burgundy one I made for my sister, you'll need:

About 200g of standard wool
A pair of 5mm standard knitting needles 
A tapestry needle (optional but helpful and very cheap)

Instructions

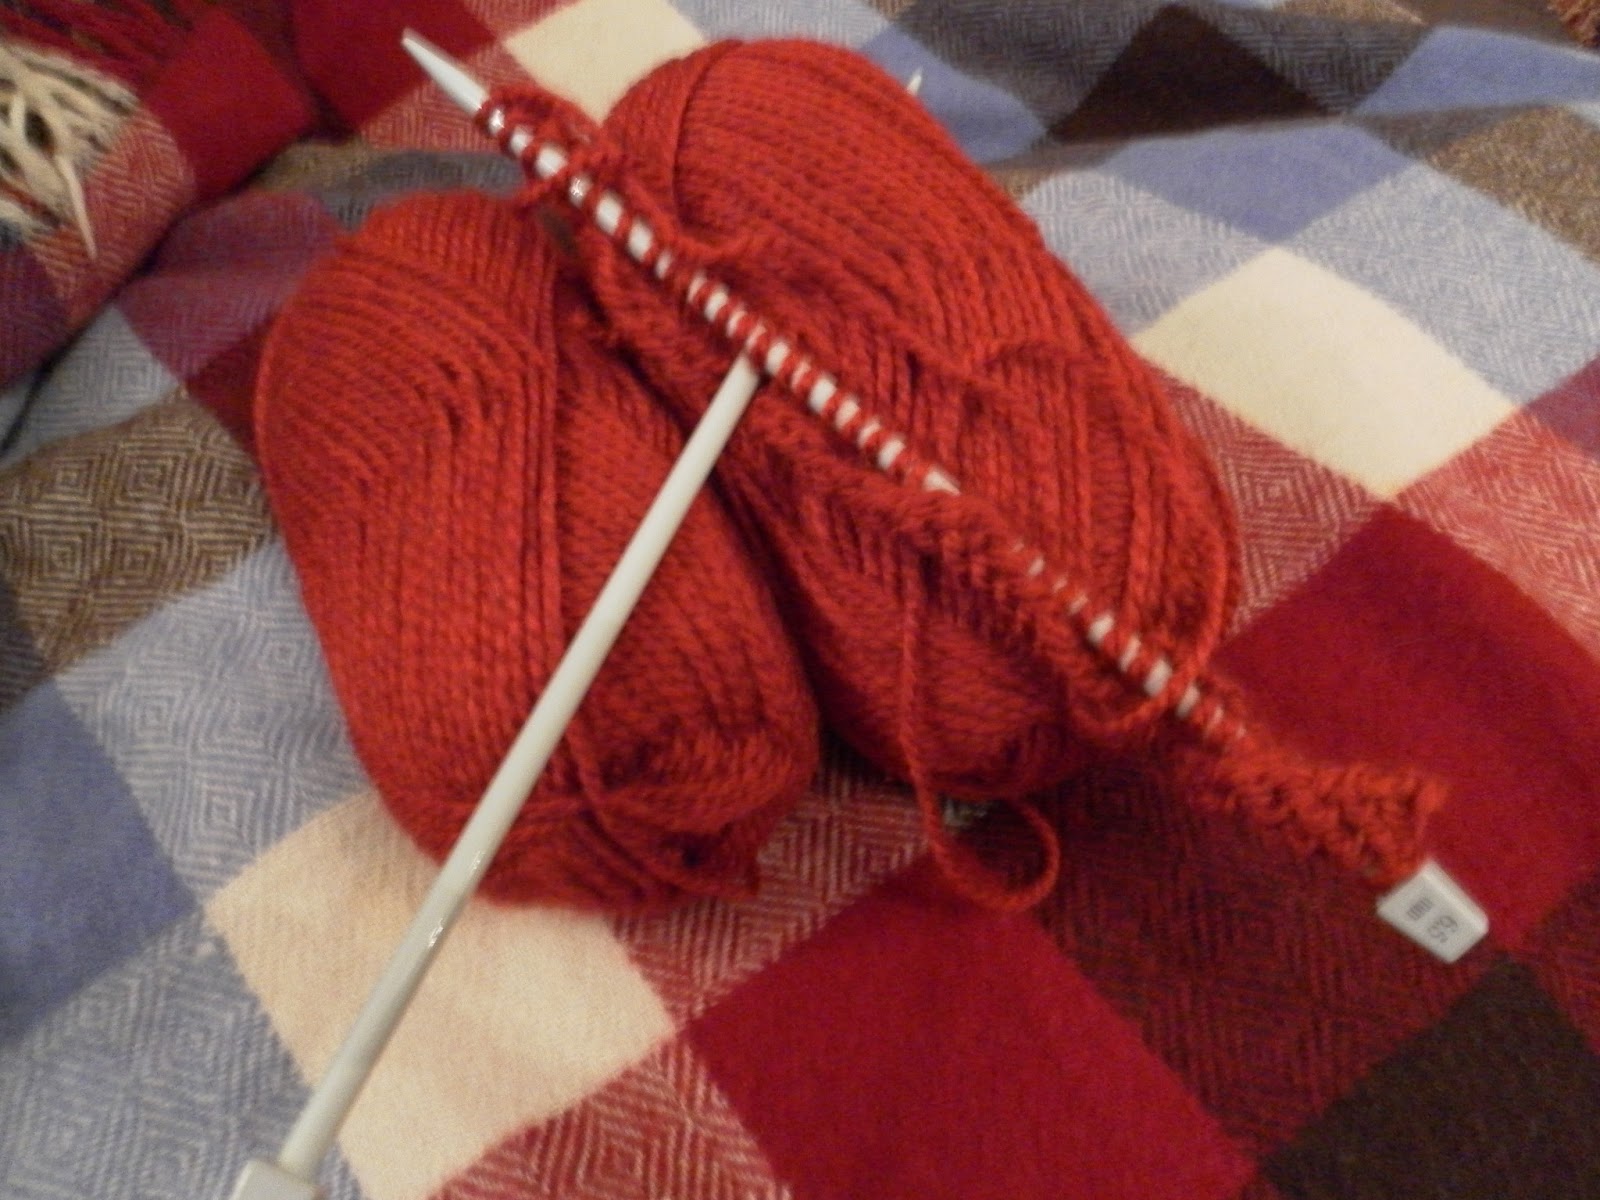
- Cast on about 50 stitches
Starting to cast on using 5mm needles 
It doesn't really matter how many stitches you do but when you spread them out evenly they should be the width you would like your snood to be. If you don't know how to cast on I suggest you refer to one of the excellent youtube videos on the subject which I use to remind myself when I forget! Note that there are various ways to cast on but I would just learn one and stick with it.
http://www.youtube.com/watch?v=7Iv03nRS8xU


- Knit in basic knit stitch for as long as you need to to make a length of scarf that would fit comfortably round the neck if it was joined at the ends.
http://www.youtube.com/watch?v=G8kF5JBkjSs : For simple knit stitch.

If you need to start a new ball of wool, see http://www.youtube.com/watch?v=cy__eVIDshE to do it properly or, just tie the ends together (to my shame this is what I usually do but it works perfectly well!). It is a good idea to check the number of stitches you have occasionally to check you haven't dropped or added any by mistake as if you drop lots you will end up with ends that don't match.

- When the length is as you want it (you may want to make a snood that you wrap around the neck twice but I prefer a chunky once round snood) cast off.
http://www.youtube.com/watch?v=eqqaIgvohcI : For casting off

- Now you will have what looks like a very short scarf. Thread the end of the wool into the tapestry needle if you have one and 'sew' the ends together using the wool. This will need to be stitched up well so that it looks like a circular scarf so take some time over this bit and don't be tempted to rush to the finish! If you don't have the right sort of needle you can probably thread it in with your fingers but it will be fiddly unless you are using chunky wool (see below).

Variations and choosing wool

You can easily vary these instructions to make stripy or more chunky snoods. I made a nice forest green and navy version for a friend for example. Perhaps you could make one in team colours for a sports fan!
The type of wool you choose will also have a big impact on the finished product (as for all knitting). Knitting with fine merino wool or cashmere blends will give luxurious items but will be more expensive, although given that the quantities of wool are low for this it will not cost you more than £10 unless you find some really expensive wool! If you buy good value average quality wool it will probably cost £3 - £5 to knit a snood but see more on buying wool below.

Thick roughly spun sheep's wool snood
In the photo to the right I used some very unrefined chunky wool I found it a market which was deliciously cosy. For this one I used much larger needles as the wool was thicker (which is the general rule). This also meant that it was very quick to knit as I didn't use many stitches per row (about 10). It is also easy to see what you're doing so is good for beginners! For very thick wool like this it is also fine to use your fingers to do the final threading in stage. 


A hot water bottle cover

This project is also good as it is also very simple and doesn't require different types of needles. The finished project is quite impressive however and could make a good present. 

Materials 

To make one like this you need:
About 100g merino wool
A pair of 3.5mm needles
A tapestry needle

Instructions

Note: As shown in the photo, this cover has bobbles on it. I had a bit of trouble with those so I'll give a version without them and explain how to do the bobbles in another post. If you want to know now get in touch and I'll give you the pattern!

- Cast on 47 stitches as for snood

-  Work in stocking stitch for 85 rows. Stocking stitch means that you alternate a row of the basic knit stitch (covered above) with a row of purl stitch. This gives a more 'refined' piece of work but the material will roll inwards so I don't think it works very well for scarves and snoods. 
As 85 is a lot of rows you may just want to measure your work and stop when it measures about 26cm. Alternatively you will find you can count the rows when you have knitted them instead of having to count in your head throughout. 

Step 1 - bring yarn forward
- It is important that you start this step on a basic knit stitch row not a purl row. This row is an eyelet row which makes holes to thread your ribbon through later. To do this:
1. Knit 4 stitches the bring the wool forward to it comes out of the work towards you instead of out though the back if the work. 
Step 2 - knit 2 together
2.Then knit 2 stitches together. This just means what it sounds. You push your right hand needle (B) past two stitches on the left needle (A), take your wool back to the back of the work and wrap it around needle B then pull the two stitches off onto needle B as normal. 
Eyelet created by bringing forward
and knitting two together


- Knit 3 stitches then bring wool forward again (step 1) and knit 2 together (step 2). Knit 1 stitch bring wool forward and knit 2 together. Repeat this stages (from knit 3) until you are 4 stitches from the end of the row. 

- Knit in stocking stitch (starting with purl) for another 28 rows (or until panel measures 36cm). 

My flatmate with the hot water
bottle and a dinosaur onsie!
- Cast off.

- Repeat all previous steps to make the other side of the cover. Then stitch the two panels together apart from the top near where the eyelets are. Stitch them together so the smooth side faces outwards. 


- Make a knitted ribbon by casting on 150 stitches then casting them all off. Thread this through the eyelets so the cover can be closed. 

Variations

Knitted ribbon threaded though eyelets
This cover would work well in a stripy pattern and it would be easy to do especially as you could make sure your knots are on the inside so they wouldn't be seen. You could also do a mini version for a mini hot water bottle by decreasing cat on stitches and number of rows worked.

Buying wool

Charity shops often have good value wool and it is good to support them so I would encourage you to look here for most projects. 
Ebay is good for bulk buying and bargains (I said I was an ebay fan!).
For a really special project you might want to look online for cashmere and merino yarn, or ideally visit your local craft shop (or even better specialist knitting shop) because then you can get the best idea of how the wool feels and can hold different colours up together. 

I hope some of you feel motivated to try knitting. There are loads of online tutorials and patterns if you want to develop this further and I bet you know someone who can help you too (my Aunt is a knitting pro!). 

Helen x


Friday, 28 December 2012

Mosaics

My sister and I used to make mosaics when we were younger, usually as 'charming!' and 'very useful!' gifts for various family members. The fact that we were able to do this at the ages of 10 and 11 is testament to how easy this sort of project can be.

Plant pot with square and cut tiles

Recently, we used a grey day to unearth our old tiles and see what we could do with them with the benefit of a few more years experience. It was a very fun and companionable way to spend a few hours and so I would urge you to try! Below are some brief instructions using an example that my sister and I made, along with some other examples of what you could do for initial projects and links to other sites with good ideas and inspirational projects.


Basic Instructions

What you will need:

Mosaic tiles
Grout
Adhesive
Spatula
An old sponge
Tile cutters and goggles (optional)
Something to decorate!


I imagine most readers will not have this equipment lying around but it is easy and inexpensive to buy. Hardware stores will have tile cutters and grout, which often doubles up as an adhesive. Mosaic tiles can be bought online (see below) unless you happen to have extra lying around from a recent bathroom re-decoration! You can also use alternative materials for 'tiles' such as broken pottery, beads, scrabble pieces...

Buying tiles:

If you do want to buy tiles I did a bit of research. There is a huge range available from basic matt tiles to glittery tiles to pearl tiles to mirror tiles... I have used mostly matt and a few glitter tiles in my projects. I am an ebay lover but if you don't have an account already then http://www.hobby-island.co.uk/ is an example of where you can buy mosaic tiles cheaply.
400 tiles for £3.64 fee P&P from ebay
81 tiles for £2.99 from hobby island
100 mirror tiles for £2.99 from hobby island
Millefiori £2.99 from hobby island
100 broken glass tiles £4.49 from hobby island
Instructions using plant pot example: 


  •  First, prepare your tiles. This step may not be necessary if, for example, you are using mirror tiles and want all of them to be in even square shapes. If you are using broken pottery however, you will have to break the plate into usable sized pieces. To do this you should wrap the plate in newspaper and break it with a hammer outside. If you are using a mixture of whole and cut tiles,you will need to cut the tiles. If you are going to do this it is very important to wear goggles as small pieces of tile may get in your eyes. For this project we used a mixture of whole and cut tiles whose colours we thought would complement the dark green and white of the plant which was to go in the pot.
  • Having prepared your tiles, you can now start mosaic-ing! To do this using adhesive and grout in one product (as we did), use the spatula to cover a small area of the pot with a layer of grout/adhesive and then press the tiles into the grout. Continue n this way until the whole pot is covered. Try to spread the grout evenly and cover the whole of the outside of the pot in grout. 


  • When the whole pot is covered in tiles, leave to set in a cool place for an hour or so / overnight. Then spread grout over the whole pot using a spatula, scraping over the tiles so the spaces between them are filled but little grout is left on the tiles themselves. 
  • Now leave the grout to set for about an hour then while it is still quite soft use an old sponge to clean the tiles. This may take a bit of scraping!
  • This is now your finished pot!
Heatproof placemat

Other project ideas


If mosaic-ing a whole plant pot seems a bit much, a simple place mat may be a good place to start. 
This project is flat and so is slightly easier. For this you need a picture frame which you can fill with grout and apply tiles to as before. 

To add more creativity to your plant pot, you may want to plant it with bulbs yourself. A mosaic decorated pot filled with hyacinth bulbs would make a lovely present for Mum or Granny!

Other projects I might try are a photo frame decorated with mirror tiles or a papemaché letter covered with broken plate tiles. I saw these ideas online:
http://www.allaboutyou.com 


mosaic letter to makePhoto frame made with broken chinamosaic flower pot to make


For the ultimate in mosaic inspiration, I visited a professional's website: http://www.ceramicsandmosaics.co.za/ which has some amazing ideas to try if you really get into these projects. Otherwise they are good for getting inspiration, for example I might try including other shapes into my next pot such as a heart shape like in this pot:
Marylou Newdigate also does ceramics so she makes her own clay shapes to include in her projects which is a bit beyond me but looks great! In this project she also combined a broken plate (the circle) with normal tiles to get a nice effect so I'm going to try that.
Many thanks to Marylou for letting me include her image on my blog.

I hope some of you feel inspired by this post and decide to try your own mosaic!

Helen x