 |
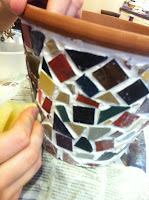
| Plant pot with square and cut tiles |
Basic Instructions
What you will need:Mosaic tiles
Grout
Adhesive
Spatula
An old sponge
Tile cutters and goggles (optional)
Something to decorate!
I imagine most readers will not have this equipment lying around but it is easy and inexpensive to buy. Hardware stores will have tile cutters and grout, which often doubles up as an adhesive. Mosaic tiles can be bought online (see below) unless you happen to have extra lying around from a recent bathroom re-decoration! You can also use alternative materials for 'tiles' such as broken pottery, beads, scrabble pieces...
Buying tiles:
If you do want to buy tiles I did a bit of research. There is a huge range available from basic matt tiles to glittery tiles to pearl tiles to mirror tiles... I have used mostly matt and a few glitter tiles in my projects. I am an ebay lover but if you don't have an account already then http://www.hobby-island.co.uk/ is an example of where you can buy mosaic tiles cheaply.
 |
| 400 tiles for £3.64 fee P&P from ebay |
 |
| 81 tiles for £2.99 from hobby island |
 |
| 100 mirror tiles for £2.99 from hobby island |
 |
| Millefiori £2.99 from hobby island |
 |
| 100 broken glass tiles £4.49 from hobby island |
- First, prepare your tiles. This step may not be necessary if, for example, you are using mirror tiles and want all of them to be in even square shapes. If you are using broken pottery however, you will have to break the plate into usable sized pieces. To do this you should wrap the plate in newspaper and break it with a hammer outside. If you are using a mixture of whole and cut tiles,you will need to cut the tiles. If you are going to do this it is very important to wear goggles as small pieces of tile may get in your eyes. For this project we used a mixture of whole and cut tiles whose colours we thought would complement the dark green and white of the plant which was to go in the pot.
- Having prepared your tiles, you can now start mosaic-ing! To do this using adhesive and grout in one product (as we did), use the spatula to cover a small area of the pot with a layer of grout/adhesive and then press the tiles into the grout. Continue n this way until the whole pot is covered. Try to spread the grout evenly and cover the whole of the outside of the pot in grout.
- When the whole pot is covered in tiles, leave to set in a cool place for an hour or so / overnight. Then spread grout over the whole pot using a spatula, scraping over the tiles so the spaces between them are filled but little grout is left on the tiles themselves.
- Now leave the grout to set for about an hour then while it is still quite soft use an old sponge to clean the tiles. This may take a bit of scraping!
- This is now your finished pot!

 |
| Heatproof placemat |
Other project ideas
If mosaic-ing a whole plant pot seems a bit much, a simple place mat may be a good place to start.
This project is flat and so is slightly easier. For this you need a picture frame which you can fill with grout and apply tiles to as before.
To add more creativity to your plant pot, you may want to plant it with bulbs yourself. A mosaic decorated pot filled with hyacinth bulbs would make a lovely present for Mum or Granny!
http://www.allaboutyou.com
 For the ultimate in mosaic inspiration, I visited a professional's website: http://www.ceramicsandmosaics.co.za/ which has some amazing ideas to try if you really get into these projects. Otherwise they are good for getting inspiration, for example I might try including other shapes into my next pot such as a heart shape like in this pot:
Marylou Newdigate also does ceramics so she makes her own clay shapes to include in her projects which is a bit beyond me but looks great! In this project she also combined a broken plate (the circle) with normal tiles to get a nice effect so I'm going to try that.
Many thanks to Marylou for letting me include her image on my blog.
I hope some of you feel inspired by this post and decide to try your own mosaic!
Helen x


No comments:
Post a Comment