Showing posts with label christmas. Show all posts

Monday, 2 December 2013

Red onion marmalade and berry jam with liquorice

Finished jars, packaged for Christmas
It's my favourite time of year for making homemade things, with Christmas coming up and cosy evenings in being just what the doctor ordered!

I made this red onion marmalade last year and it was delicious, I kept a jar back to eat this year and after keeping it is even better!
The jam was inspired by jam I had at The Modern Pantry in London. I couldn't find a recipe for it but I gave it a go with nice results. I would never eat liquorice flavoured sweets but a hint of it in jam is quite delicious!

Red Onion Marmalade

Ingredients

1.25kg red onions
3 tbsp salt
1kg sugar
500ml apple or cider vinegar
1.5tsps cloves tied in muslin

Method

First chop your onions into fine rings, this is quite important as it will have a big impact on the texture of your marmalade.
Add all the ingredients to a large pan and cook on a low boil for a long time (depending on the heat about an hour and a half) until the onions are translucent, the marmalade is thick and reaches setting point. Don't be tempted to cook it until it is totally stiff, there may be quite a lot of caramel coloured juice still when it reaches setting point. 
If you don't have muslin it is not essential but you will have whole cloves in your preserve. That doesn't really bother me but it would probably be better to use muslin which you can then remove before you decant into jars. 

This preserve is a bit more effort than usual because of all the chopping but I promise it is delicious and improves with keeping. Try it with meat, cheese or on pizza!

Berry and liquorice jam

I had in mind to try this jam after having it on toast at the Modern Pantry in Clerkenwell in London. I didn't find liquorice until this weekend though so when I did I wanted to try it straight away!
It's not really the season for jam making in that there isn't so much fruit around but I had some frozen mixed fruit in the freezer along with some blackberries I picked in August so I used that. 

Liquorice root from the rag market in Birmingham.
Can also be used to make tea!

Ingredients

2 teaspoons chopped liquorice
300g berries
300g sugar
Juice of half a lemon

Makes one large jar (I was doing a test batch!)


Method

Infuse your liquorice root for around 10 minutes in 30ml boiling water until it makes a very strong tea.

Defrost your fruit (in the microwave if you have one) and then add the sugar, lemon juice and liquorice tea. Boil until it reaches setting point (see previous post on strawberry and rhubarb jam). It may take a little longer than usual to set due to the extra liquid added.
Pour into hot jars when still hot, place a wax disc on top and screw the lid on tightly.
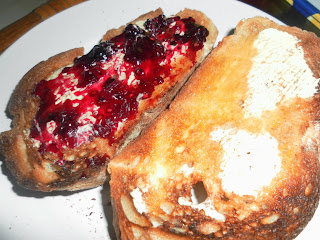
 I found that this combination of fruit made a very dark purple jam and I didn't have any problems with scum on the top - perfect!


Perfect jam for tea and toast!

  Packaging

 As usual I have tried to make my jars look pretty for presents. This time I used translucent gold paper and wool or twine, with some brown paper labels. I tried out my new alphabet stamps on the onion marmalade label which I think looks nice (obsessed with stamps now).


Thursday, 13 December 2012

Christmas wrapping

Hi again! Given the lead up to Christmas I'm going to share my tips for creating (what I think are) beautiful wrappings on a budget....
I'm not really a fan of shiny or glittery wrapping at Christmas time and prefer to go for a 'rustic' approach to make my presents stand out!

Christmas Wrapping
Brown paper is inexpensive and looks striking under the tree when partnered with nice ribbon or even coloured wool if you're on a real budget.
Present tags can be made out of the fronts of old Christmas cards or can be made out of nice card as shown below...

Homemade cards and tags
This year I tried making my own Christmas cards for the first time and found it surprisingly easy! I bought some dark green cards and envelopes from Hobbycraft (£2 for 5 but you can buy them cheaper in bulk or online) and decorated them simply with ribbons and buttons. This is all you'll need:

  • Nice coloured cards (pre-bought or made yourself from card if you don't need envelopes)
  • Coloured wool in a contrasting colour to the card
  • Large-eyed needle (for wool) and thread needle
  • Assorted buttons
  • Ribbons
  • PVA glue
  • Scissors
  • A sharp pencil
It would be more arty and authentic to collect your own buttons (or raid your Mum's/Granny's sewing box) but you can also buy a big bag from Hobbycraft for £3 which will last for ages.

To make the cards I cut a length of ribbon and stuck it about 0.5cm from the edge of the card. I then arranged the buttons in a heart shape and used a pencil to draw around the buttons to mark where they should be. It looks nice to use different coloured buttons for this.
I then took the buttons off the card and put them on the table in the same shape. 
I then took the buttons one by one and used a thread needle to pierce the card under the holes in the buttons to make it easier to fit the large needle through. 
I then used coloured wool to sew the buttons onto the card. 
I then used a bit more if the wool to make a small bow and sewed this above the buttons. 


I was very pleased with the result and decided to branch out a bit and try doing a 'Santa hat' version as well although I'm not sure this was as effective! It might be nice for a younger recipient however. For this one I used a pencil to draw a santa hat shape and then used the thread needle to pierce holes around the pencil line. I was then able to sew around the shape using the large-eyed needle and red/white thread. I used a large white button for the pompom at the end of the hat and sewed some buttons at the top as before.


At this point I ran out of cards but was rather in the swing of things so decided to try some tags too. For this I just cut out some pretty card and sewed on buttons and ribbons as before. I then threaded some ribbon or wool through the tags and tied then around the wrapped parcels to make a great finished Christmas gift!


Time and cost effectiveness
Once I got the hang of getting the wool needle through the card these cards were quite quick to do and took about 20 minutes each. The tags were quicker and took about 10 minutes. The cost depends a lot on what bits and bobs you have already but could be the price of a few ribbons and cards! I calculated the cost of my cards to be about 75p each which I think is well worth the time and it was great fun.  

I hope some of you feel inspired to try this. I think I'm going to do this every year!


Helen x