Sunday, 28 April 2013

Raspberry vinegar

Now that the weather is getting warmer I'm feeling more tempted by salads, and my absolute favourite is goat's cheese and beetroot. I therefore decided to try out a recipe for homemade raspberry vinegar as I thought the fruity sharpness would be great in that sort of salad. The recipe is really straightforward and you could easily make it in bulk if you wanted to give some to friends. The vinegar is dark red and syrupy when it is finished so looks very pretty in clear glass bottles.


Ingredients


500g raspberries
300ml cider vinegar
Granulated sugar

This amount will give you a small batch to start with so unless you have mountains of raspberries to use and nothing to do with them (I would suggest making raspberry jam if this is the case) then I would try it small scale first to check that you like it and have occasion to use it. The vinegar does keep for about a year so I think I'll be making some more when I run out.

Of course ideally you would use raspberries from your garden or allotment but as you will see from the time of year I didn't! Doing trial runs with small quantities however means that when you do have an excess of produce you will know exactly what to do with it and will have all the 'kit' handy. Raspberries are in season in the UK from July to November as there are summer and autumn varieties.

You will also need:

Jelly bag or muslin (you can get these in cooking shops for a few quid)
Sterilised glass bottles with caps (sterilise in the same way as the jars in my homemade chutney post)
A  funnel

I used a couple of glass jars that had posh lemonade in that took 350ml as they were a nice shape and colourless to let the pretty colour of the vinegar show. If you were making a large batch you could use wine bottles.
Straining the fruit vinegar through a jelly bag

Method


  • Crush the raspberries lightly with a wooden spoon in a large bowl
  • Add the vinegar
  • Cover the bow and leave in a cool place for 4 days
  • Pour the contents of the bowl through a scaled jelly bag (this means you pour boiling water through it first)
  • After half an hour squeeze it to get most of the juice through then discard the raspberries
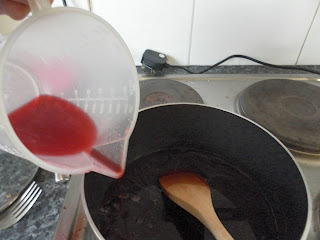
Adding the fruit vinegar to sugar in a pan
  • Measure the liquid and add 225g sugar for every 300ml
Bringing to the boil
  • Bring to the boil over a low heat, stirring gently for about 10 minutes
Bottling
  • Remove from the heat and leave to cool before bottling through a funnel

If you are giving the fruit vinegar as a gift, cut out a circle of brown paper using the rim of a large mug as a template and secure it over the bottle cap with some pretty wool or rustic looking twine. Fill out a label and stick it on the bottle. 


I used some of my first batch drizzled over an avocado, beetroot and goat's cheese salad and found that nothing else was needed in the dressing. The vinegar could be mixed with a little oil however.

Avocado, beetroot, goat's cheese and lettuce with homemade raspberry vinegar

Monday, 15 April 2013

Customised t-shirt

Just a quick post on something 'craft-y' as I've been veering towards the food and drink theme lately.
This is a quick way to cutomise a plain t-shirt to make something personalised and original...
'Boyfriend fit' grey t-shirt


What you need


A plain t-shirt
Some pretty material
Some cardboard (e.g. cereal packet)
Some thread which matches the colour of the material
A needle
An iron
Some scissors (pinking sheers if you have them)
Sewing machine (optional)

This could also be a clever way to cover a stain or hole in an old t-shirt or you could buy a cheap t-shirt like I did. A loose fitting t-shirt looks better for this laid back look.
The material I used was from an old summer dress that I don't wear any more. You could go for this approach or buy some really nice fabric you like the look of. You will only need a 'fat quarter' or 250cm material if that so even luxurious fabric won't be breaking the bank.

Instructions

Step 3

  1. Draw the shape you want your pocket to be on the back of the cardboard and cut it out to make a template
  2. Iron your material (or a section of it)
  3. Draw round the cardboard template on the back of your material with a biro pen (you don't want the ink to show through it)
  4. Cut around the shape with an extra cm or so around the edge
  5. Iron the pocket shape with the extra cm of fabric folded under so there is a sharp crease
  6. Sew along the top line of the pocket (with a sewing machine if you have one)
  7. Pin the fabric to the t-shirt in the desired place (a tape measure or ruler may be useful here)
    Step 7
  8. Sew carefully round the edge of the pocket, leaving the top of the pocket open. Take care not to sew through the back of the t-shirt! You can use a sewing machine here as well if you prefer.


And there you have it! A half hour project that you can wear with pride!


Sunday, 14 April 2013

Simple chutney - spiced plum

Making a simple chutney is a great way to start if you fancy doing some preserving. You don't need any specialist equipment and if you don't get it perfect the first time you will still have a delicious chutney. I will post on jam later on as this is a bit more difficult as you need to get the setting point right or you will have a very runny (or stiff) jam.
This chutney is delicious with cheese or cold meats and makes a lovely present when packaged up nicely.

Ingredients

How it should look at the start of step 4
1kg plums
300g onions
1 garlic clove
400ml malt vinegar
400g brown sugar
100g raisins/sultanas/other dried fruit if you have it
1 tsp cinnamon
1 tsp mixed spice
1cm gated fresh ginger
salt and pepper to taste

5 jam jars with lids 
Wax discs 

In an ideal world you would use fruit from your garden (or your neighbor's) but if this isn't feasible I would suggest buying your fruit from a market which tends to be much better value, reduces packaging and supports local business.

The wax discs can be boughts online, from cooking shops and sometimes from supermarkets. These are inexpensive and well worth buying to help your preserves keep longer.


How it should look at the end of step 4

Method

  1. Soak jars in hot water for a few hours until the labels peel off easily, wash the jars thoroughly.
  2. Place the jars in a 100 degree centigrade oven until hot or microwave (this sterilises the jars)
  3. Meanwhile, quarter the plums and remove the stones. Finely chop the onion and mince the garlic.
  4. Put the plums, onions, garlic, half of the vinegar and the spices in a large pan and simmer until soft.
  5. Add the dried fruits (if using), sugar and remaining vinegar.
  6. Stir over a low heat until the consistency of thick jam.
  7. Add salt and pepper to taste.
  8. How it should look at the end of step 7
  9. Spoon the chutney into the sterilised jars while still hot. Fill up to about 1cm from the top and place a wax disc waxy side down so that it covers the top. Screw on the lid (using a tea towel to protect your hands as it will be hot!).

Finished chutney
Chutney improves with keeping so keep your jars in a dark place for a few weeks before enjoying (if you can resist!).

Presenting your jars

One of the nicest things about making your own preserves is packaging them beautifully and giving them as gifts. 
Firstly, make sure the jars and nice and clean, a sticky jar will ruin the effect!
Second, write the name of the jam and month and year it was preserved on a pretty label and stick it on the jar.
Lastly, make a fabric top for your jar using an old checked shirt or pretty patterned bit of fabric.
You will need to cut a circle quite a bit bigger that the jam lid then you can cover the top of the jar and secure using an elastic band and some rustic looking string.

Variations

This chutney is a good starter but the same principles can be applied to many different types of chutney. All you need is to make sure you have the right proportion of fruit and sugar to preserve the chutney and give it a good flavour. 
This recipe can be used as a starter but you ca experiment by varying the 1kg fruit and tweaking the spices to your taste. Apple makes a good addition to many chutneys including this one. Rhubarb is a good base for chutney if you have it growing in your garden but needs other fruits to give a more distinctive flavour such as dried apricots. 
I suggest finding some good value fruit and then googeling recipes until you find one you fancy!

Sunday, 7 April 2013

No guilt berry crumble

The other night I had a desperate craving for a pudding but all I had was some vanilla ice cream and a few store cupboard essentials. I was determined not to head out and buy a pudding after I'd eaten (a slippery slope I fear) so whipped up some mini crumbles in 10 minutes all out of ingredients I had in my cupboard. These mini puddings will satisfy your sweet tooth without leaving you feeling guilty and bloated...


Ingredients

Frozen berries / whatever fruit you have around
1 tbsp oats
2 tbsps white flour (plain or self raising)
1 tbsp butter or margarine
2 tsps sugar (I prefer brown)
Amaretti biscuits (optional)
Vanilla ice cream or cream to serve


Method

  1. Preheat the oven to 200 degrees centigrade
  2. Blend the butter, four and oats together in a bowl with your fingers until the mixture is crumbly. If it feels a bit dry and powdery add a little butter, if it is very moist add a little flour
  3. Stir in the sugar and 3 amaretti biscuits (if using, I just happened to have them in the cupboard)
  4. Place the fruit into little glass or ceramic ramekins and sprinkle the crumble topping on top. Don't press the crumble down too much or it will be too hard when it comes out of the oven
  5. Sprinkle a little sugar and oats on the top
  6. Bake for about 15 minutes or until the fruit is bubbling and the top is browned. Serve with ice cream and a tea spoon!
If you have some plums, apples or pears in the fruit bowl that are going a little soft you can use these in combination with berries on their own. These fruits work well with a little cinnamon which is a natural sweetener so you can use less sugar. Raisins or other dried fruits can also be added.

I use little glass ramekins that you buy 'Gu' puddings in. These work really well!

To make a super healthy version, swap the flour for brown flour and use more oats, minimise the fat used and add margarine instead of butter. Half the sugar added and add a little honey or cinnamon to the fruit to sweeten it naturally. Serve with yogurt for a pudding so virtuous it can hardly be called pudding.

I like this recipe as it affords some portion control over pudding size, is very quick and doesn't require lots of special ingredients. Enjoy!