Tuesday, 24 December 2013

The ultimate homemade luxury: homemade florentines

In my view these jewelled beauties are the ultimate homemade luxuries. They are really quite simple to make but look impressive and are delicious with coffee or as an after dinner treat. I made a box this year for my grandparents.

Fruit and nut mixture for the florentines

Ingredients

Chopped blanched almonds and glace cherries
I don't usually like baking things which have lots of ingredients, but most of these things you will already have in the cupboard, and for the fruit and nuts you can mix and match with what you already have. Particularly around Christmas, you will probably find that you have lots of these things already. 

50g butter
125ml double cream
125g sugar
150g candied fruit (a mix of glace cherries and citrus peel is nice, but I threw in some dried cranberries into this mix as I had some in the cupboard. If you like ginger you could add some finely chopped stem ginger)
200g toasted nuts (this could be just flaked almonds, but you can use chopped blanched almonds, pecans, hazlenuts)
50g plain flour
250g chocolate (I usually use about 50% cocoa solids, but see below)

Toasted flaked almonds and hazlenuts


Method

1. First prepare your fruit and nuts. If you are using whole hazlenuts or almonds that still have their skins on, you will first need to remove the skins. For the almonds, blanch them in boiling water, leave them in their for 5 minutes and then they should pop out of their skins. For the hazlenuts, roast them and then rub them vigorously  in a tea towel to remove the skins.

2. If you are using glace cherries, wash off the syrup with hot water and then cut them into quarters. Chop any other fruit or nuts into equivalent size pieces but don't worry too much about this - it creates a nice texture if the bits are different shapes and sizes. 

3. Next heat the butter, sugar and cream until it is homogenous and liquid. 
Step 4

 4. Then stir in the flour and fruit and nuts.

 5. Spoon a full teaspoon of the mixture onto a baking sheet covered with greeseproof paper and press it down slightly into a circle

 6. Fill the sheet with these circles, leaving a good space between them

Step 4

Step 6


 7. Bake the biscuits at 180 degrees for about 10 minutes until they start to turn golden. This will happen quite quickly so keep an eye on them!

Step 7 - baked florentines

 8. Take the baking paper off the trays and lie it flat so that the biscuits set flat. They will be quite flexible still at this stage so be careful.

Step 9
9. Melt the chocolate in a glass or ceramic bowl over a pan of water, or microwave it carefully. You can use one type of chocolate or use a mixture of dark, milk and white chocolate if you want a selection of florentines. I tend to mix dark and milk chocolate together to make one sort of florentine that is slightly bitter but not too dark.

10. When they are cool (about an hour later) turn the biscuits the other way up on a tray or plate and cover them in chocolate.

Step 10


 Package your florentines in a box lined with aluminium foil with a layer of foil in between layers if you are doubling up. Tie the box with a pretty ribbon if you are giving the florentines away.


Finished box of 18 florentines, with 10 left over for eating!


Monday, 2 December 2013

Red onion marmalade and berry jam with liquorice

Finished jars, packaged for Christmas
It's my favourite time of year for making homemade things, with Christmas coming up and cosy evenings in being just what the doctor ordered!

I made this red onion marmalade last year and it was delicious, I kept a jar back to eat this year and after keeping it is even better!
The jam was inspired by jam I had at The Modern Pantry in London. I couldn't find a recipe for it but I gave it a go with nice results. I would never eat liquorice flavoured sweets but a hint of it in jam is quite delicious!

Red Onion Marmalade

Ingredients

1.25kg red onions
3 tbsp salt
1kg sugar
500ml apple or cider vinegar
1.5tsps cloves tied in muslin

Method

First chop your onions into fine rings, this is quite important as it will have a big impact on the texture of your marmalade.
Add all the ingredients to a large pan and cook on a low boil for a long time (depending on the heat about an hour and a half) until the onions are translucent, the marmalade is thick and reaches setting point. Don't be tempted to cook it until it is totally stiff, there may be quite a lot of caramel coloured juice still when it reaches setting point. 
If you don't have muslin it is not essential but you will have whole cloves in your preserve. That doesn't really bother me but it would probably be better to use muslin which you can then remove before you decant into jars. 

This preserve is a bit more effort than usual because of all the chopping but I promise it is delicious and improves with keeping. Try it with meat, cheese or on pizza!

Berry and liquorice jam

I had in mind to try this jam after having it on toast at the Modern Pantry in Clerkenwell in London. I didn't find liquorice until this weekend though so when I did I wanted to try it straight away!
It's not really the season for jam making in that there isn't so much fruit around but I had some frozen mixed fruit in the freezer along with some blackberries I picked in August so I used that. 

Liquorice root from the rag market in Birmingham.
Can also be used to make tea!

Ingredients

2 teaspoons chopped liquorice
300g berries
300g sugar
Juice of half a lemon

Makes one large jar (I was doing a test batch!)


Method

Infuse your liquorice root for around 10 minutes in 30ml boiling water until it makes a very strong tea.

Defrost your fruit (in the microwave if you have one) and then add the sugar, lemon juice and liquorice tea. Boil until it reaches setting point (see previous post on strawberry and rhubarb jam). It may take a little longer than usual to set due to the extra liquid added.
Pour into hot jars when still hot, place a wax disc on top and screw the lid on tightly.

 I found that this combination of fruit made a very dark purple jam and I didn't have any problems with scum on the top - perfect!


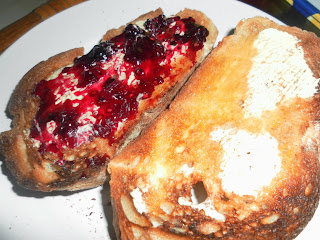
Perfect jam for tea and toast!

  Packaging

 As usual I have tried to make my jars look pretty for presents. This time I used translucent gold paper and wool or twine, with some brown paper labels. I tried out my new alphabet stamps on the onion marmalade label which I think looks nice (obsessed with stamps now).


Saturday, 31 August 2013

Blackberry bounty

How to make the most of a delicious blackberry crop


I love this time of year. Breezy and warm, you can start wearing light knits and dig out your knee high boots... It's also perfect for one of my favourite activities - blackberrying. I heard somewhere that this was a good year for blackberries, and was very pleasantly surprised to find a glut growing along the canal even in my city location. As a country girl by heart, this was very pleasing! I picked nearly a kilogram of them and then set about making some goodies....


Blackberry and Apple Gin

I have infused vodka and gin with fruit in previous years with very good results but haven't tried this particular combination before. After a quick google though I saw that it had good reviews so I thought I would give it a go. I'll update you with some photos and taste reviews in November when it is ready!


Early stages of gin infusion
 For this blackberry and apple gin I used:

225g cooking apple, peeled and cored
225g blackberries (give them a good wash first and let them dry - you don't want to dilute the gin)
150g sugar
600ml gin (decent quality but don't use mega expensive stuff)

I put all the ingredients in a big (1.5l) jar so that it would be easy to shake up over the coming weeks to dissolve the sugar. In a couple of months I'll strain the mixture through muslin and put it in a pretty bottle.

This cost about £10 to make but you could do it cheaper with cheaper gin. I just made a small batch as it was my first try but if it is a success I will be making more next year as they make fab presents and improve with a couple of years' storage.


Two months later....

I passed the gin through a sieve which was enough to remove the bits of fruit and give a lovely coloured clear gin. If there are bits still in there though, strain it through some muslin.

I used some brown card luggage labels and MY NEW STAMP(!!) to label this bottle. This was a present from a good friend who obviously knows me very well. After trying out this stamp I went a bit 'stamp mad' and ordered quite a few things so expect to see more crafts with stamps in my next post!


Blackberry and Apple Jam


Blackberry and apple are a winning flavour combination and this is a great jam to make as apples are high in pectin so you don't need to add any and it sets easily.

Make this jam as for strawberry and rhubarb with half sugar and half fruit. I used half and half apple and blackberry but if you have loads of blackberries you could go up to 70% berries it might just take a bit longer to set.

Ingredients (for 2 large jars)

300g blackberries
300g cooking apples, peeled and cored
half teaspoon vanilla essence (optional)
600g sugar

Method

Stew the apple for a little first with a small quantity of water if needed as it takes a little while to break down, if it needs help when it get a bit soft use a potato masher to break it up. Add the blackberries and sugar and bring to the boil. It will go a fabulous colour!


Jam near setting point

Test the set often (see strawberry and rhubarb jam post) as it will not take long at all once the sugar is added (mine was 15 minutes) and a loose set is preferable to a very firm one. Pour into sterilised jars, cover with a wax disc and seal. Have with toast or crumpets when you need cheering up or give some to a friend!

Jam jar ready to give away - great colour!

And what to do with the rest....

Blackberry and apple compote with yogurt
My Granny has an apple tree in her garden and every year there is a big harvest which she makes into compote and freezes to use the whole year for a simple pudding with yogurt or in pies or crumbles. This is quite a labour of love with apples but is worth it I promise! If you managed to harvest lots of backberries then you can freeze them directly to use in smoothies etc or this year I made some into a blackberry and apple compote with cinnamon. The ratio of blackberry: apple doesn't matter here at all, just stew it up in a pan, add brown sugar to taste and a half teaspoon of cinnamon per 500g fruit. 
Try it with yogurt for a virtuous breakfast (yummy with homemade granola!) or pop it in the freezer for use in a crumble later on. 

Apple and blackberry compote for freezing

Monday, 5 August 2013

Village fayre


Cold Aston Fayre

This is a bit different from my other blog posts as it isn't really a 'how to' it's more of a general description and some photos of the village fayre we had last weekend to raise money for the village school and church. I have been going to this my whole life and my Mum is in charge of running the preserves and produce stall which is a big reason behind why I got into making things myself. 

Preparations.....


Last minute redcurrant jelly...
Bread baking the day before


Cutting up and old shirt to make jam jar covers...


Country grain bread and lemon and poppyseed cake (which never made it onto the stall....)


Blackboards ready...
 We bought some of these blackboards but for the others we painted old boards with blackboard paint.

On the day...

 People from the village bring over jam, fruit from their gardens, veg from their allotment, bread and other goodies like elderflower cordial and chicken and ham pies which we set out nicely on the stall.

The stall with fresh herbs, flowers and breads...

We had 200 jars of jam this year


Swiss chard, cabbages, courgettes and potatoes...

More courgettes(!) beetroot and garlic

Sweet peas, flowers cut that morning, bread, cordial and eggs


We used old picnic hampers to display the bread 
One girl made goodie baskets with flapjacks, chocolates, fudge, chutney and blackcurrant cordial - a great idea

The cake stall made over £800 this year!


I hope some of you feel inspired to bake, make and grow for a good cause this year!

Chillies

In my view the lovely taste of chilli often gets overlooked because of its spiciness. This sweet chilli jam recipe is one way of preserving the freshness and taste of chillis without burning your tongue off. You can vary the number of chillies as you like to cater to your own tastes. I have used a recipe which gives a kick but is sweet enough to allow you to put a big dollop in a BLT.

Drying chillies, herbs and chilli jam 

Sweet Chilli Jam


Ingredients

Red peppers, chillies, red onion, garlic and ginger

Large red onion
600g plum tomatoes (you can use cherry)
5 red peppers
6 large red chillies
Thumb sized piece of ginger
6 cloves garlic
700g sugar (I use a mix of granulated and brown)
200ml cider vinegar

Method


This recipe is really easy. Just chop your veg and grate your ginger and put to the side (if you prefer you can save time by using a food processor). Be careful when chopping chillies that you don't rub your eyes and nose as it will sting! If you have any cuts on your fingers wear plastic gloves. You will have to do this at least partly by hand as you need to remove the seeds from the chillies.

Heat the vinegar and sugar in a large saucepan until it is clear and then add the other ingredients. Simmer until the mixture has a thick jam consistency (this could take about 40 minutes). This will take a surprisingly long time due to all the water in the tomatoes.


Boil for a minute and then pour into hot sterilised jars (see plum chutney post for tips on this).  Label and give to chilli lovers as a much appreciated gift!

Red pepper and chilli jam


Cost 


I got all my ingredients from the local market as tomatoes and peppers can be expensive. I was luck enough to get 1kg tomatoes, 6 peppers and a huge bowl of chillies for £2 making this a steal to make. See below for how I used the rest of the chillies!


Drying chillies and herbs


Drying chillies and herbs
If you have extra chillies you can easily dry them in your kitchen like this. String them onto thread with a needle and thread and tie them up in a warm place in your kitchen for a couple of weeks. Leave them there until you want to crumble them into sauces / stews / curries or when they are totally dry store them in a jar.
This works for leftover herbs too. I find I often have lots left when I buy herbs from the supermarket. Rosemary and thyme dry particularly well.


Eating your chilli jam


My favourite way to eat chilli jam is on my semi-virtuous hangover day fry up. This recipe is great for when you feel a bit ill or miserable and lazy and want a fry up without consuming too much animal fat. It also uses very few ingredients!

Ingredients


2 inches chorizo sausage
1 sweet potato
Green beans
1 egg


Put a very small amount of oil in a pan and fry the sliced chorizo for a couple of minutes until it starts to release it's own oil.
Microwave your sweet potato if you want to cut down on frying time and add it to the pan with your green beans (and any other green veg you feel like adding). Fry until lightly browned, push to the side and add your egg. Fry the egg until the white is all opaque and transfer to a plate. Add a large dollop of chilli jam and enjoy!


This recipe counts as two of your five a day and contains much less fat than your traditional fry up and much more flavour.