Saturday, 31 August 2013

Blackberry bounty

How to make the most of a delicious blackberry crop


I love this time of year. Breezy and warm, you can start wearing light knits and dig out your knee high boots... It's also perfect for one of my favourite activities - blackberrying. I heard somewhere that this was a good year for blackberries, and was very pleasantly surprised to find a glut growing along the canal even in my city location. As a country girl by heart, this was very pleasing! I picked nearly a kilogram of them and then set about making some goodies....


Blackberry and Apple Gin

I have infused vodka and gin with fruit in previous years with very good results but haven't tried this particular combination before. After a quick google though I saw that it had good reviews so I thought I would give it a go. I'll update you with some photos and taste reviews in November when it is ready!


Early stages of gin infusion
 For this blackberry and apple gin I used:

225g cooking apple, peeled and cored
225g blackberries (give them a good wash first and let them dry - you don't want to dilute the gin)
150g sugar
600ml gin (decent quality but don't use mega expensive stuff)

I put all the ingredients in a big (1.5l) jar so that it would be easy to shake up over the coming weeks to dissolve the sugar. In a couple of months I'll strain the mixture through muslin and put it in a pretty bottle.

This cost about £10 to make but you could do it cheaper with cheaper gin. I just made a small batch as it was my first try but if it is a success I will be making more next year as they make fab presents and improve with a couple of years' storage.


Two months later....

I passed the gin through a sieve which was enough to remove the bits of fruit and give a lovely coloured clear gin. If there are bits still in there though, strain it through some muslin.

I used some brown card luggage labels and MY NEW STAMP(!!) to label this bottle. This was a present from a good friend who obviously knows me very well. After trying out this stamp I went a bit 'stamp mad' and ordered quite a few things so expect to see more crafts with stamps in my next post!


Blackberry and Apple Jam


Blackberry and apple are a winning flavour combination and this is a great jam to make as apples are high in pectin so you don't need to add any and it sets easily.

Make this jam as for strawberry and rhubarb with half sugar and half fruit. I used half and half apple and blackberry but if you have loads of blackberries you could go up to 70% berries it might just take a bit longer to set.

Ingredients (for 2 large jars)

300g blackberries
300g cooking apples, peeled and cored
half teaspoon vanilla essence (optional)
600g sugar

Method

Stew the apple for a little first with a small quantity of water if needed as it takes a little while to break down, if it needs help when it get a bit soft use a potato masher to break it up. Add the blackberries and sugar and bring to the boil. It will go a fabulous colour!


Jam near setting point

Test the set often (see strawberry and rhubarb jam post) as it will not take long at all once the sugar is added (mine was 15 minutes) and a loose set is preferable to a very firm one. Pour into sterilised jars, cover with a wax disc and seal. Have with toast or crumpets when you need cheering up or give some to a friend!

Jam jar ready to give away - great colour!

And what to do with the rest....

Blackberry and apple compote with yogurt
My Granny has an apple tree in her garden and every year there is a big harvest which she makes into compote and freezes to use the whole year for a simple pudding with yogurt or in pies or crumbles. This is quite a labour of love with apples but is worth it I promise! If you managed to harvest lots of backberries then you can freeze them directly to use in smoothies etc or this year I made some into a blackberry and apple compote with cinnamon. The ratio of blackberry: apple doesn't matter here at all, just stew it up in a pan, add brown sugar to taste and a half teaspoon of cinnamon per 500g fruit. 
Try it with yogurt for a virtuous breakfast (yummy with homemade granola!) or pop it in the freezer for use in a crumble later on. 

Apple and blackberry compote for freezing

Monday, 5 August 2013

Village fayre


Cold Aston Fayre

This is a bit different from my other blog posts as it isn't really a 'how to' it's more of a general description and some photos of the village fayre we had last weekend to raise money for the village school and church. I have been going to this my whole life and my Mum is in charge of running the preserves and produce stall which is a big reason behind why I got into making things myself. 

Preparations.....


Last minute redcurrant jelly...
Bread baking the day before


Cutting up and old shirt to make jam jar covers...


Country grain bread and lemon and poppyseed cake (which never made it onto the stall....)


Blackboards ready...
 We bought some of these blackboards but for the others we painted old boards with blackboard paint.

On the day...

 People from the village bring over jam, fruit from their gardens, veg from their allotment, bread and other goodies like elderflower cordial and chicken and ham pies which we set out nicely on the stall.

The stall with fresh herbs, flowers and breads...

We had 200 jars of jam this year


Swiss chard, cabbages, courgettes and potatoes...

More courgettes(!) beetroot and garlic

Sweet peas, flowers cut that morning, bread, cordial and eggs


We used old picnic hampers to display the bread 
One girl made goodie baskets with flapjacks, chocolates, fudge, chutney and blackcurrant cordial - a great idea

The cake stall made over £800 this year!


I hope some of you feel inspired to bake, make and grow for a good cause this year!

Chillies

In my view the lovely taste of chilli often gets overlooked because of its spiciness. This sweet chilli jam recipe is one way of preserving the freshness and taste of chillis without burning your tongue off. You can vary the number of chillies as you like to cater to your own tastes. I have used a recipe which gives a kick but is sweet enough to allow you to put a big dollop in a BLT.

Drying chillies, herbs and chilli jam 

Sweet Chilli Jam


Ingredients

Red peppers, chillies, red onion, garlic and ginger

Large red onion
600g plum tomatoes (you can use cherry)
5 red peppers
6 large red chillies
Thumb sized piece of ginger
6 cloves garlic
700g sugar (I use a mix of granulated and brown)
200ml cider vinegar

Method


This recipe is really easy. Just chop your veg and grate your ginger and put to the side (if you prefer you can save time by using a food processor). Be careful when chopping chillies that you don't rub your eyes and nose as it will sting! If you have any cuts on your fingers wear plastic gloves. You will have to do this at least partly by hand as you need to remove the seeds from the chillies.

Heat the vinegar and sugar in a large saucepan until it is clear and then add the other ingredients. Simmer until the mixture has a thick jam consistency (this could take about 40 minutes). This will take a surprisingly long time due to all the water in the tomatoes.


Boil for a minute and then pour into hot sterilised jars (see plum chutney post for tips on this).  Label and give to chilli lovers as a much appreciated gift!

Red pepper and chilli jam


Cost 


I got all my ingredients from the local market as tomatoes and peppers can be expensive. I was luck enough to get 1kg tomatoes, 6 peppers and a huge bowl of chillies for £2 making this a steal to make. See below for how I used the rest of the chillies!


Drying chillies and herbs


Drying chillies and herbs
If you have extra chillies you can easily dry them in your kitchen like this. String them onto thread with a needle and thread and tie them up in a warm place in your kitchen for a couple of weeks. Leave them there until you want to crumble them into sauces / stews / curries or when they are totally dry store them in a jar.
This works for leftover herbs too. I find I often have lots left when I buy herbs from the supermarket. Rosemary and thyme dry particularly well.


Eating your chilli jam


My favourite way to eat chilli jam is on my semi-virtuous hangover day fry up. This recipe is great for when you feel a bit ill or miserable and lazy and want a fry up without consuming too much animal fat. It also uses very few ingredients!

Ingredients


2 inches chorizo sausage
1 sweet potato
Green beans
1 egg


Put a very small amount of oil in a pan and fry the sliced chorizo for a couple of minutes until it starts to release it's own oil.
Microwave your sweet potato if you want to cut down on frying time and add it to the pan with your green beans (and any other green veg you feel like adding). Fry until lightly browned, push to the side and add your egg. Fry the egg until the white is all opaque and transfer to a plate. Add a large dollop of chilli jam and enjoy!


This recipe counts as two of your five a day and contains much less fat than your traditional fry up and much more flavour.


Sunday, 2 June 2013

Rhubarb and Strawberry Jam

Finished jam 
This is my absolute favourite jam. Even if you don't like rhubarb you will like this, as the flavour is very subtle and somehow seems to bring out the strawberry-ness of the strawberries.


Ingredients

500g strawberries (not too ripe)
600g rhubarb
1.1kg sugar
1 packet pectin
Juice of one lemon

The pectin and lemon are used here as strawberries and rhubarb are both low in pectin and acid which are needed to let the jam set. You could also substitute the sugar for jam sugar and leave out the pectin but jam sugar is quite a bit more expensive. I have got a good set before using only lemon juice but I would try with pectin first unless you don't mind your jam being a bit runny.

This recipe made me 5 jars of jam but one was a large kilner jar.
I got my fruit from a market so spent £2.50 on it overall. The best thing of course would be for you to use homegrown fruit! I would encourage you not to use supermarket strawberries and they can be very expensive and sometimes a bit tasteless. If you have kids you might want to go to a pick your own strawberry farm. I did this last year and made the jam on the day which gave it an amazing fresh flavour. If you have lots of rhubarb available but not many strawberries (which may well be the case if you grow your own rhubarb which is very prolific!) then you can reduce the ration to 1:2 strawberries to rhubarb. This still has a great strawberry flavour if you use nice strawberries. 

Method

  • Chop the rhubarb into approx one inch chunks although don't bother being precise as the rhubarb will break down in cooking. Wash it. 


  • Place the rhubarb and sugar in the pan which you will use to boil the jam. Don't try and use a small pan for this as it will take ages and be difficult to stir! Leave the rhubarb in the pan with the sugar while you sterilise the jars (see previous post on plum chutney if you don't know how) and chop the strawberries so it's starts releasing it's juice.


  •  Chop the strawberries into quarters (these will mostly stay whole through cooking) and add to the pan.  Add the pectin and lemon juice. 


  •  Turn the hob up to high and stir to stop the sugar burning. In a few minutes the sugar will melt and the jam start to bubble. Bring it to the boil and stir occasionally 


  • After about 20 minutes test the set of your jam but spooning a small amount onto a cold plate. Let the jam cool and then run your finger through the circle of syrup. If the jam wrinkles when you push it it is set. This is the only difficult bit of making jam but it is worth being patient and testing a few times or your jam will be very runny (I have to admit mine was a bit runny on this go as I was inpatient but it is still delicious). 
  • Once setting point is reached take your jam off the heat and leave to cool until the jam is about 90 degrees (this is hard to do exactly without a thermometer but use your best guess). 
  • Spoon the jam into sterillised jars which are still warm. The jam being hot will help keep it sterilised so don't leave it too long. Put waxed discs on to of the jam and seal the jars. This time I used a kilner jar for me as I use lots of this jam and wanted to have a big jar for the summer! Kilner jars are quite expensive but if you want to give a special present you might want to use one. I got mine from a charity shop for £1 and intend to reuse it but to buy new they cost about £3. 
  • As for the chutney, get creative with your labeling if you want your jars to look pretty. I think that extra 10 minutes at the end is well worth it to package your beautiful homemade preserves.


  •  Try this jam simply on toast, stirred into rice pudding, on porridge, with granola and yogurt....

Variations

Of course if you are a purist strawberry jam lover you could make this with just strawberries. 
The addition of vanilla is also a nice touch but remember to use natural vanilla essence or a vanilla pod (which you should take out before spooning the jam into jars). 

Cost

This batch of jam cost me about £4 to make (for 5 jars) but depends a lot on how much you spend on fruit!


Saturday, 1 June 2013

A homemade bread lesson


I have recently got into making homemade bread and have since made about 10 successful loaves. I'm not sure if this qualifies me to teach others how to become master bakers but if you haven't made bread before I would strongly encourage you to give it a go. Its therapeutic, you can get great results without much practice, it's much healthier than eating bought bread (especially if you experiment with different types of flour) and its not at all expensive.


This basic recipe can be used with a variety of types of flour. This loaf was made with half strong white flour and half country grain flour but I will describe variations later.


Ingredients

450g flour
300ml water
7g salt
5g yeast

The length of the ingredients list is testament to how simple making a loaf of bread is. It also highlights the difference from shop bought loaves which will have all manner of chemicals added!

You can use any normal table salt for this recipe.

Method


  • If you are using normal dried active yeast (not easy bake yeast) you will need to reactivate it first. Do this by mixing 5g in a mug or small bowl with 50g tepid water (one third boiling to 2 thirds cold) and half a teaspoon of sugar. When measuring water weigh it don't use a measuring jug as this is more accurate. Leave the yeast for 10 mins while you weigh the other ingredients.
  • Weigh the ingredients into a bowl, it is easiest to do this with electric scales. Remember that as you have used 50g water to reactivate the yeast only add 250g tepid water to the mixing bowl. Mix the salt in. 
  • When the yeast is frothy on top, add it to the other ingredients and mix in the bowl.
  • Turn the dough (which will be a bit sticky at this stage) onto a clean surface

Kneading


One method of kneading is shown in my video below:


This is a traditional method which uses the hell of your palm to stretch the dough. This method is fine for most dough but can get a bit  messy if your dough is sticky.

An alternative method is shown in my video below:


This is useful for stickier doughs or at the end of your kneading when you want to get the dough into a good shape.

Using your preferred method (or a mixture), knead the dough for 10 minutes. Scrape out or clean your mixing bowl (it doesn't have to be pristine) and coat the bowl with  a little olive oil to stop the dough drying out. Then fold the dough into a ball and put it in your mixing bowl and cover in cling film.

Leave the dough to rise until it has doubled in size (this depends on the temperature of the room but will probably be between 1 and 2.5 hours). To speed it up put the heating on!


Knocking back  

When the dough has doubled in size, turn it gently onto your work surface and pull, push and knock it into a flat oval shape. Then take the 'corners' of the dough and fold it into the center from several points, prodding the corners down. Then turn your ball over and shape it as shown in my video below:


Proving

Place your ball onto some oiled greaseproof paper and place your mixing bowl upside down on top to keep it moist. If your mixing bowl isn't very big the dough might tough the sides as it rises so you might want to cover it in oiled cling film instead.

Once again leave the dough until it has regained it's original size (about one hour). It is better to under prove than over prove at this stage so if you're not sure leave it for less time. 

Baking

Preheat the oven to 250 degrees and have a baking tray in the hot oven. Put a dish of water in the bottom tray (the moisture helps get a good bake). When your dough is ready transfer it (this is where the baking paper helps!) onto the tray. After 10 mins turn the oven down to 200 degrees. Bake for another 30 minutes.
The timings will vary slightly depending on your oven. This worked in mine which is not fan assisted so you might want to take the time down a little. 

Once the bread has come out of the oven leave it to cool on a wire rack and don't eat straight from the oven as it will give you tummy pains!

Try eating with cheese and the plum chutney from April's post. I did and the chutney has had a couple of months to mature now and was delicious.


Variations

There are endless variations to making bread as you know! Another version I have tried is 50% rye flour, 25% white flour and 25% wholemeal flour which is great with smoked salmon and very filling. If you find the rye to dense then you can reduce the quantity and replace it with white flour. Rye flour can be a little harder to find and is a bit more expensive but I found the dough easier to work with. 50% wholemeal and 50% white loaves are also good. Adding walnuts and raisins is also yummy if you want to add a bit more to you bread. I'll include some other varieties when I have tried them!

Cost

As there are very few ingredient in these loaves they work out very cheap to make. You can get flour for as little as 80p for 1.5kg and yeast is very cheap (especially if you buy a tin instead of sachets which I do as  don't like throwing any away). More specialist flours are a bit more expensive but the loaves you make with still cost you under a pound which compared to the prices charged at artisan bakeries etc is very good.

A nice loaf like this with some homemade chutney (see previous post) and some good cheese would make a great offering to take to a dinner party.

Sunday, 28 April 2013

Raspberry vinegar

Now that the weather is getting warmer I'm feeling more tempted by salads, and my absolute favourite is goat's cheese and beetroot. I therefore decided to try out a recipe for homemade raspberry vinegar as I thought the fruity sharpness would be great in that sort of salad. The recipe is really straightforward and you could easily make it in bulk if you wanted to give some to friends. The vinegar is dark red and syrupy when it is finished so looks very pretty in clear glass bottles.


Ingredients


500g raspberries
300ml cider vinegar
Granulated sugar

This amount will give you a small batch to start with so unless you have mountains of raspberries to use and nothing to do with them (I would suggest making raspberry jam if this is the case) then I would try it small scale first to check that you like it and have occasion to use it. The vinegar does keep for about a year so I think I'll be making some more when I run out.

Of course ideally you would use raspberries from your garden or allotment but as you will see from the time of year I didn't! Doing trial runs with small quantities however means that when you do have an excess of produce you will know exactly what to do with it and will have all the 'kit' handy. Raspberries are in season in the UK from July to November as there are summer and autumn varieties.

You will also need:

Jelly bag or muslin (you can get these in cooking shops for a few quid)
Sterilised glass bottles with caps (sterilise in the same way as the jars in my homemade chutney post)
A  funnel

I used a couple of glass jars that had posh lemonade in that took 350ml as they were a nice shape and colourless to let the pretty colour of the vinegar show. If you were making a large batch you could use wine bottles.
Straining the fruit vinegar through a jelly bag

Method


  • Crush the raspberries lightly with a wooden spoon in a large bowl
  • Add the vinegar
  • Cover the bow and leave in a cool place for 4 days
  • Pour the contents of the bowl through a scaled jelly bag (this means you pour boiling water through it first)
  • After half an hour squeeze it to get most of the juice through then discard the raspberries

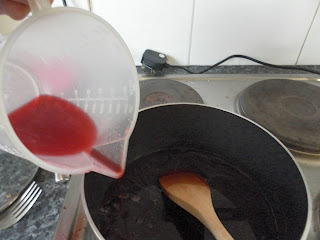
Adding the fruit vinegar to sugar in a pan
  • Measure the liquid and add 225g sugar for every 300ml
Bringing to the boil
  • Bring to the boil over a low heat, stirring gently for about 10 minutes
Bottling
  • Remove from the heat and leave to cool before bottling through a funnel

If you are giving the fruit vinegar as a gift, cut out a circle of brown paper using the rim of a large mug as a template and secure it over the bottle cap with some pretty wool or rustic looking twine. Fill out a label and stick it on the bottle. 


I used some of my first batch drizzled over an avocado, beetroot and goat's cheese salad and found that nothing else was needed in the dressing. The vinegar could be mixed with a little oil however.

Avocado, beetroot, goat's cheese and lettuce with homemade raspberry vinegar